
Hello Crafters!
Here is another beautiful card made at our regular card making workshops.
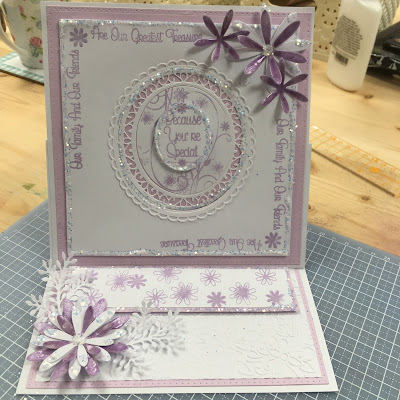
This card is a sample made using the 'Dainty Daisies Stamp Collection' and uses the gorgeous 'Pearl Lustre Embossing Powders' from Phill's cosmic shimmer range. The pearl lustre powders give a softer, but more pearlescent finish when embossing. The flowers have been 'double embossed' to give a really stunning glossy look! This colour is the 'Decadent Oak' used with Chestnut Foundation Card, but I have attached some other examples using different colour combinations.
To stamp with the pearl lustre powders it is really important to use the anti-static bag and be quite generous as the mica content means the powder clings more. After applying 'perfect medium' to the stamp and heat embossing, leave the stamped image for a few minutes and then wipe away any excess pearl lustre powder with a very soft tumble dryer sheet. This just helps to lift off any left over powder and ensures the area around where you have stamped stays clean!
The stamps that I have used for the main sentiment are the 'Dainty Daisies Everyday Sentiments' and the corners have been stamped with the 'Dainty Daisies Everyday Corner Sentiments'. The gorgeous swirly pattern behind the sentiment has been done using the 'Dainty Daisies Flourishes & Corners'. It just adds that extra bit of loveliness to the card!
To double emboss the flowers, we have pressed the die cut flower 'right-side' down into the perfect medium pad. Your fingers get a bit sticky, but it's all part of the fun! Turn the flower over and cover with the pearl lustre powder, shaking off any excess. Heat emboss gently until the powder melts. The first finish will look a bit 'wishy-washy', but don't worry as you are going to repeat the process again to ensure the final finish is lovely! (be sure to allow the flower to completely cool before pressing back into the perfect medium).
To finish off the flowers we have used the Pearl PVA in the coordinating colour in the centre, and sprinkled over glitter jewels for extra bling.
The oval frame has been created using the 'Grace' die Sue Wilson's Frame & Tags collection. I love this die as it is so versatile. Here, we have set the dies down into the card, but you could easily build the layers up to add more depth.
When making easel cards you need to make sure that the flat, base layer of the card has a 'lifted' part so that the top part can rest on it and stand easily. Here we have used a simple border stamped randomly with 3 daisies from the 'Dainty Daisies Flourishes & Corners' and using the same Pearl Lustre embossing powder. We have lifted the border with double sided foam tape.
We have finished off the card with Sue Wilson dies: Delicate (Daisies Complete). and Delicate Fronds.
Here is what I used (with links to the WWW if you need them)
The Full Card


Close Up


Close Up


Decadent Grape

Here is what I used (with links to the WWW if you need them)
- Sentimentally Yours Dainty Daisies Collection - A5 Everyday Sentiments
- Sentimentally Yours Dainty Daisies Collection - A5 Flourishes & Corners
- Sentimentally Yours Dainty Daisies Collection - A5 Everyday Corner Sentiments
- Phill Martin Cosmic Shimmer Colours - Decadent Oak Pearl Lustre Embossing Powder
- Sue Wilson Dies - Double Pierced Squares Set A
- Sue Wilson Dies - Delicate Daisies Complete
- Sue Wilson Dies - Delicate Fronds
- Cosmic Shimmer Glitter Jewels - Iced Snow
- A4 Embossing Folder - Jacobean Floral
- Woodware - Anti-Static Bag
The Full Card

Close Up

Close Up

Close Up

Close Up

Decadent Denim

Decadent Grape

Remember -We are more than happy for you to replicate our cards in your own style :-)
Happy Crafting!

PS - Don't forget to 'like' Phill's Facebook page and follow him on Twitter to keep in touch, you can also find him on Pinterest and Instagram for ideas and inspiration :-)
(Links below)
Facebook: Twitter: Pinterest: Instagram: Honeypot Crafts (my website): You Tube Channel


